

How to Enhance Your Engagement Ring with a Beautiful Ring
- April 2, 2026
- blog
An engagement ring is more than just a piece of jewelry—it’s a symbol of love, commitment, and a lifelong promise…. Read More
Do you need a convenient automatic Word logging location for your Windows 10 or 11 operating system? No need to worry about where are autosaved word files stored because we have you covered! Microsoft Word is widely used, but many users forget the importance of recording their work. Luckily there is an automatic recording feature that helps prevent data loss. In this article we will take you through the search process, enable and access Word’s automatic storage locations in Windows 10 and 11. Hurry up!
To use the automatic saving function in Microsoft Word 2023. Make sure your files are stored in Microsoft Cloud. To enable automatic local file saving in Windows 11, you will need to use the latest version of Office. Follow these simple steps:
After completing these steps, you can easily find documents saved in Word. There are plenty of options for you.
To access Word’s automatic saving location in Windows 10, you need to enable the feature first. Here’s how:
Once you have found an auto-saving location on your computer, open Word and navigate to the specified directory. You can automatically find the saved files and double-click them to open them in Word. If the directory is hidden in an AppData folder, you can access it by entering the folder’s address in the file search bar. Or you can manually access the folder by following the given path and exposing the hidden items to view the appData form.
The process remains the same for Windows 11. So if you are wondering how to enable Word Auto Saving Position in Windows 11, just follow the same steps.
If you have lost an unsaved Word document for any reason, you can try a free word recovery software like WinfrGUI. This software thoroughly scans your computer to find temporary Word files and documents that have not been saved. Follow these instructions:
Word’s AppData folder contains automatic saving settings. However, versions and settings may affect locations. For Microsoft 365 users on Windows 10 or 11, unsaved files may be found under C:\Users\Your_username\AppData\Local\Microsoft\Office\UnsavedFiles.
Search for backups in C:\Users\You_user\AppData\Roaming\.Microsoft Word or C: \Usars\Your_user_name\AppData \Local\Microsoft\Office\UnsavedFiles
Automatically saved files usually have a letter or sheet added before the file name, accompanied by the “.mpt” extension and numeric values. The automatic recovery file may have the “.kwb” extensions.
To find these files, you can use the search function of the file detector or search for the “.asd” or “.wbk” files in the search bar.
If Word fails unexpectedly or you close the program without saving it, you can still access the location of the auto logger. Here’s what you need to do:
You will be taken to an automatic saving folder where you can select the document you want to recover.
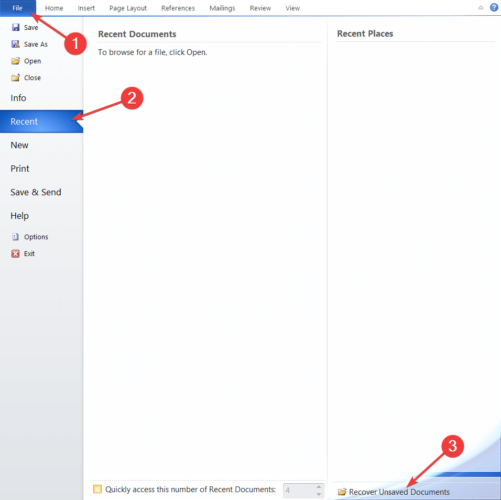
Another option is to navigate to file -> information -> version management -> recover unsaved documents.
Do not forget to check the recycling tank to see documents that have not yet been saved. Word will normally create backup documents that end up in recycled tanks if they were not saved before. You may find documents that you deleted by mistake.
If you have trouble locating an automatic saving location, try searching for a specific backup file such as.asd or.wbk. Here’s what you do:
Your system will locate all the.wbk and.asd files. Right-click on the file and select a location to open the file. This will reveal the Word automatic saving location and display all the files created by the AutoTwo entertainment function.
If you can’t find a.asd or.wbk file, you can try searching for a.tmp file or other options to find a temporary file associated with Word.
Sometimes automatically saved files are stored in the same directory as your normal files. These documents are usually hidden, but the following steps will help you discover them:
If you believe you have saved the document but can’t recognize its location, try using the search function on your Windows 11 PC.
Press the Windows button and type the document name or use the associated keyword.
If the search results contain the desired document, click to open it.
In conclusion, it is important to know how to locate Word’s automatic saving location in Windows 10/11 to avoid data loss and find important documents. By following the steps described in this manual, you can easily access and manage saved files automatically. This makes your operations secure and secure.